New feature releases
June 5, 2026
We just released a new feature to streamline adding images or files to your pages.
If you have a Repeating field that lets you add one or more images or files, you can now bulk upload them and have them automatically added to the field.
For example, you may have an "Images" field where you can add multiple image items. You can now select multiple images from your computer and upload them at once. The alternative is to add a new item, upload an image, and repeat.
If your repeating field has an image or file upload, you'll now see an upload button to the right at the top of the field. Click that to get started.

A pop-up will open where you can upload the images. If the repeating field has more than one upload field type (like an image and a file upload) then you can select which field you're uploading to. Click the "Select files to upload" button to select one or more files from your computer.
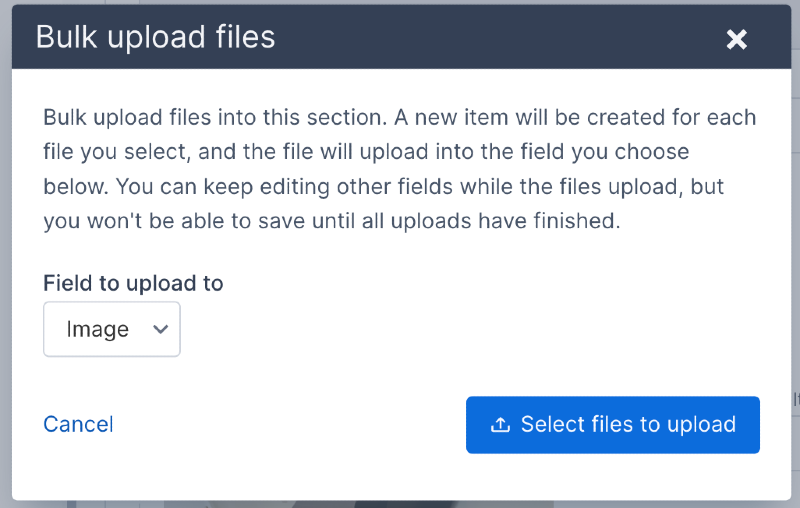
Once you've selected the files, the pop-up will automatically close, and the new items will be added. Your browser will automatically scroll down to the first item that was added.
If the repeating field doesn't have any values yet, then the empty first item will be replaced, and new items will be added after that.
If the repeating field has one or more items that already have values, then the new items will be added after the last item.
May 28, 2026
A few new features for the Self Storage app.
- You can now delete and edit payment methods. When editing, you can change everything but the credit card. This is useful if you need to update the billing address or expiration date. If you need to change the credit card, add a new one instead.
- If there are multiple payment methods, you can now change which one is the primary payment method.
May 22, 2026
Improved how error messages are displayed to be more helpful. Also added support for clicking on an error message and scrolling to the field that has the error.
Updated all add/edit forms for app items to use the new accordion view to display groups. This keeps the fields in a linear section and makes it easier to search for fields and scroll.
May 21, 2026
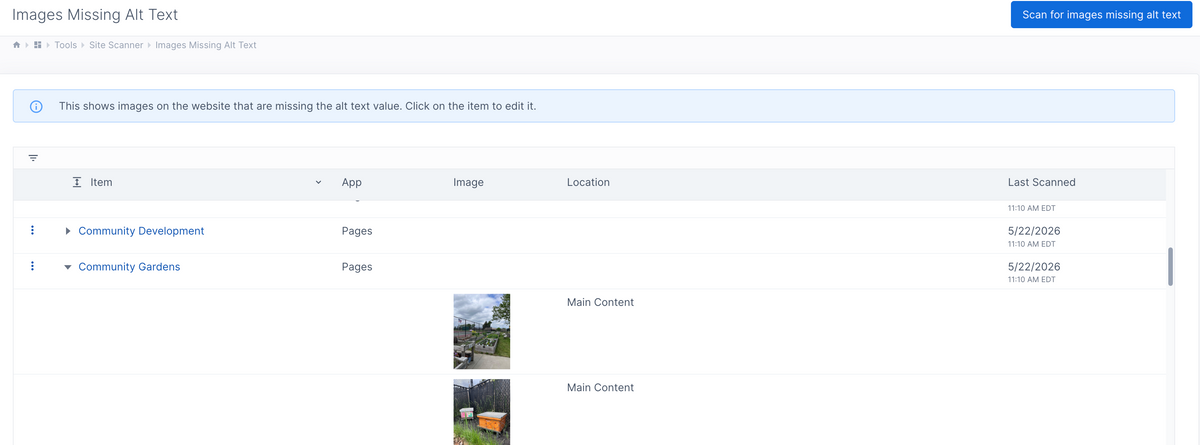
Added a new tool to help with improving website accessibility.
You can now scan the website and find images that are missing the alt text value.
Go to Site Manager -> Tools -> Site Scanner.
This will scan the content stored for each page, app item, content snippet, template, and collection widget and find any images that are missing alt text. If there are any images missing alt text, then they show in a table with a link to the page. You can expand the row to see which images are missing alt text. The images show the general area of the page where they are located.
May 18, 2026

Added support for requiring the alt text for images when adding and editing content. This helps to enforce accessibility requirements with images.
Image alt text is used by screen readers to describe an image and is important for maintaining accessibility.
Go to Settings -> Images to enable this. (For existing websites, this is off; for new websites, this will be enabled by default.)
The following will happen when this setting is enabled:
- When adding or editing an image in the rich text editor, the image description (alt text) field will now be required. You can't close the image popup until you enter some alt text.
- Image upload fields will require that the image description (alt text) field be filled in.
- When submitting the form, image upload fields will be validated to ensure that their alt text is filled in.
There is some flexibility with the image upload fields. Sometimes, the alt text is always set in a template. In that case, you can configure the upload field not to require alt text. Usually, in that case, you also want to hide the alt text field, which you can do by editing the field configuration.
May 13, 2026
Self-storage: Improved handling of incomplete subscriptions. A subscription can be incomplete if a customer signed an agreement but didn't pay for it.
- Added admin support for deleting incomplete subscriptions.
- Added admin support for activating an incomplete subscription.
May 6, 2026
Collection Widgets have been migrated to the new administration. This brings UI improvements and some new functionality, such as improving the process of copying Collections, Items, Fields, or Templates. We have more new features planned, and this gives us a better foundation to build on.
There is now a new way to set up admin fields to conditionally show based on the value of another field. Previously, you had to set up a "Select Display" field. This limited the controlling field to only a select menu, and all of the logic was in that one field. Now, with any field that isn't an app default field, you can set the conditional display with that individual field. You can select a checkbox, radio, select menu, multi-select, or switch (Select yes/no) field to be the trigger.
We also added support for this new conditional display functionality to work with Blocks. Previously, only app attributes and Collection Widgets had this functionality. Now Blocks do as well.
April 24, 2026
- Added support for a State field to be linked to a Country field. This allows custom attributes to be linked so that when a Country field changes, the State field loads the states or provinces for the selected country.
- Fixed an issue with resizing images where sometimes the new dimensions weren't passed back to the admin field and consequently aren't saved with the updated image.
April 21 2026
- Added new "Phone" field type. This allows structured data for phone values such as area code, phone number formatting, and extensions.
- UI improvements to admin navigation.
- Store product administration improvements.
- Added Universal App settings in the new administration.
April 13, 2026
Initial release of the new Boards app to manage boards, board members, and board meetings.
April 7, 2026
Finished migrating the user permission management to the new administration. Websites on the Pro plan can now manage admin access permissions for Website Editor users.
April 2, 2026
Self-Storage app updates:
- Added support for viewing subscriptions and invoices by building, unit, or unit type.
- Added support for updating a subscription to the current unit type price.
- The subscription list and detail page now show if the subscription is a different price than the unit type price.
- Added support for editing a subscription invoice.
March 27, 2026
Added "Unavailable Units" report to the Self-Storage app.
Updated Calendar Events admin to support event registration fields. The old admin had this, and now the new admin UI does too.
March 21, 2026
Self-storage app updates
- Renamed Unit Groups to Buildings.
- Added support for images as a default attribute for buildings, locations, units and unit types.
- Migrated more settings pages to the new administration.
March 20, 2026
- Improvements to how public accounts and customer accounts are created and managed.
- Fixed a bug where a username and password wouldn't sometimes be set up for a new customer account.
March 14, 2026
Self-storage app updates
- When adding or editing a customer, you can now edit the customer address, company name, alternate name, and additional phone numbers.
- Importing Customers, Buildings, Locations, Units, and Unit Types works in the new admin.
- Added support for editing the storage subscription start date.
- Added a new Notes section to view, delete, and update notes that are added to customers, subscriptions, transactions, or invoices. You can also change the author for a note.
- Notes can now be moved from a customer to a subscription and vice-versa.
- Notes can now be imported.
February 27, 2026
Import and export block fields
You can now select and export one or more block fields as a JSON field. You can then import those fields into another block. This is very useful if you need to set up similar fields on multiple blocks or copy block fields to another website.
New admin UI updates
App Pages are now part of the new admin UI for the Blog, Calendar, Store, Storage, Trails, and Universal app.
Self-Storage merge customers
You can now merge two customers together. This is helpful if you have duplicate customer profiles. Go to the customer profile that you want to merge into, click the menu button in the top right, and then click "Merge customers". Select the customer that you want to merge. All subscriptions, invoices, transactions, and notes will be merged in and the old customer will be removed.
February 24, 2026
Two new features to make it easier to move content between Repeating Grid and Repeating components.
Export and import Repeating Grid component values
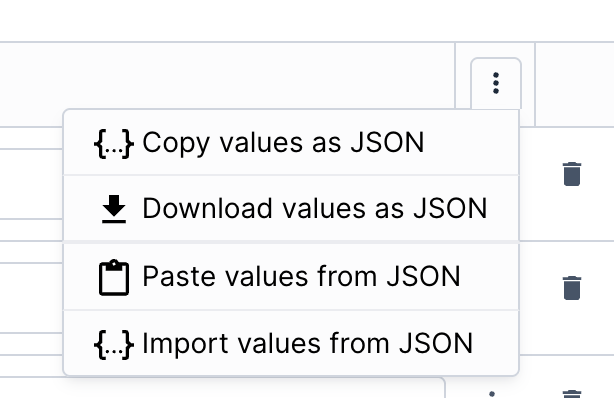
To make it easier to move content between Repeating Grid components, you can now copy the values or download the values as JSON. You can then either paste the values or import the values into another repeating grid component. If that repeating grid already has values, you will be prompted on whether to overwrite the existing values or append the new values.
Export and import Repeating component values
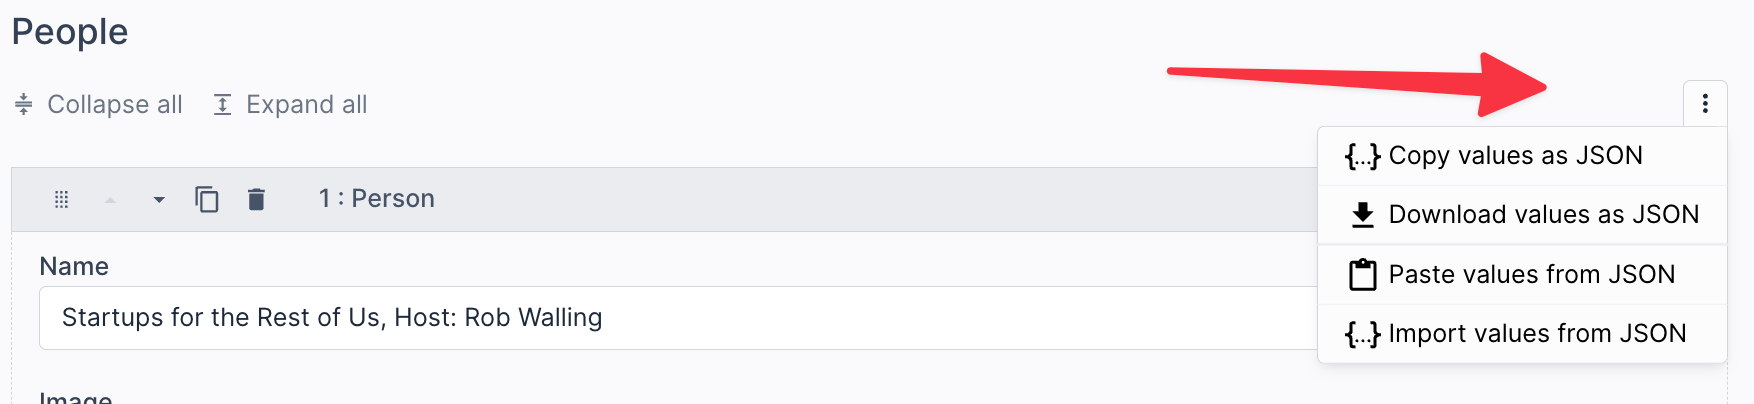
Similar to the Repeating Grid functionality, you can also copy the values from a Repeating component or download them as JSON. You can then either paste the values or import the values into another repeating component. If that repeating component already has values, you will be prompted on whether to overwrite the existing values or append the new values.
February 22, 2026
Added support for exporting one or more blocks and importing one or more blocks. Go to Design -> Blocks to do this. The blocks get downloaded as JSON.
This makes it easier to copy blocks from one website to another. Importing blocks adds new ones and does not overwrite existing ones.
You can also go to the block detail page to export a single block. You can import the JSON for a single block on that page to update and overwrite the existing block fields, settings, and template.
February 21, 2026
New features for working with file and image upload fields.
Copy the file name, URL, or image content
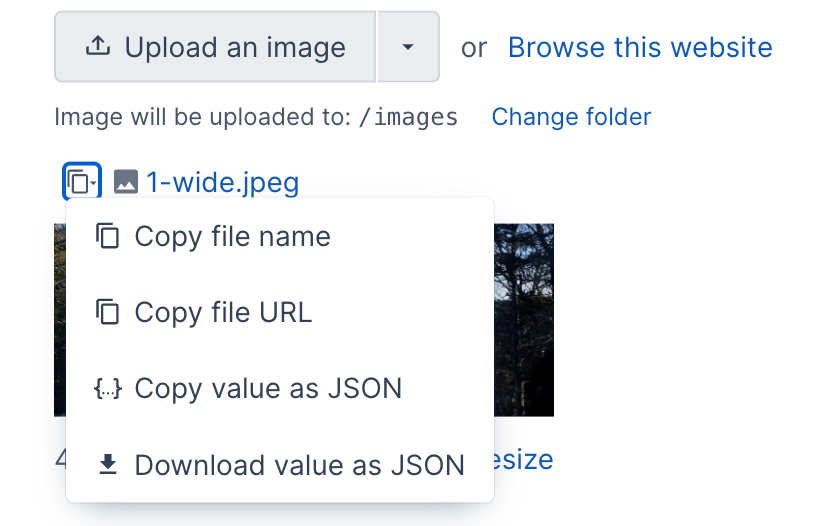
You can now copy the file name or the full URL for a file or image. It will be copied directly to your clipboard.
You can also copy the entire file or the image upload field value, or download the field value as JSON. This makes it easier to reuse or move content to another file or image upload field.
Click the "copy" icon next to the file name, then select the appropriate option in the menu.
Additional options for setting a file or image value
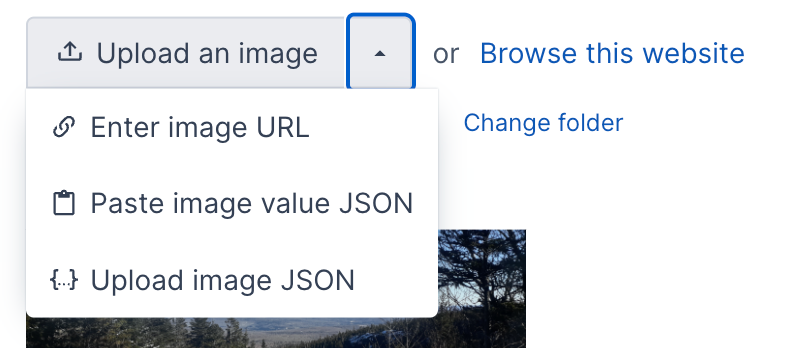
Since you can copy the value for a file or image field, you can also paste that value into another file or image upload field. This makes it really easy to copy or move values to another field. If this is your first time using it, your browser may prompt you to allow access to your computer's clipboard.
If you downloaded the value of another field as JSON, you can also upload the JSON file to set the field value. This would be an alternate method to the copy/paste method.
Enter a URL for a file or image
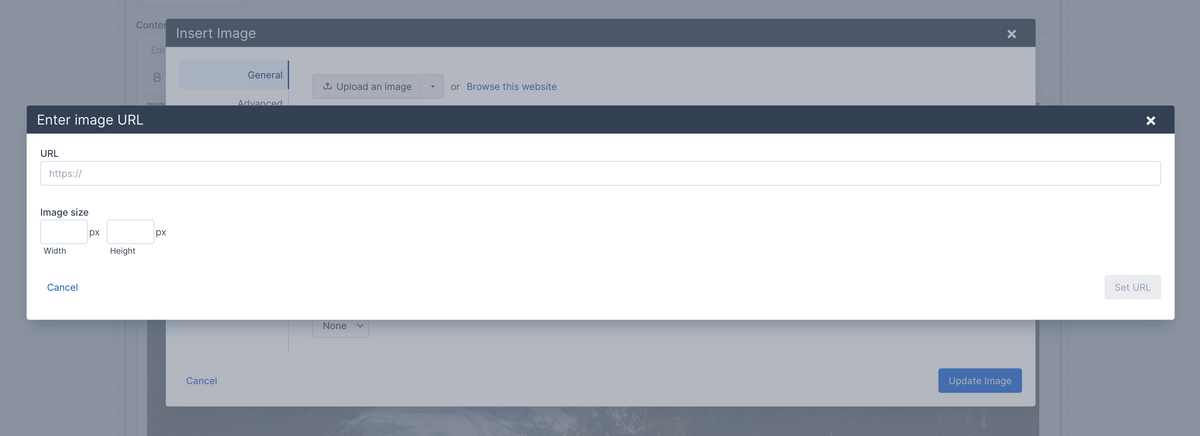
Instead of uploading an image, you can now enter a URL for a file or an image upload field. This enables you to reference content outside of your website or reference an existing website file without using the file browser.
If you are setting an image and the image URL is on the current website, it will automatically fetch the image dimensions. Otherwise, you can enter the image width and height.
February 5, 2026
User management updates
- Added support for inviting a user to an account.
- Added support for unassigning a user from multiple domains when viewing the user profile.
- Added support for clearing the user configuration values. (User configuration is used for the user interface configuration. For example, which columns to sort a table by. None of it is critical information, and it's safe to clear.) View your user details to clear.
Self-storage app updates
- Updated the subscription page to improve how the information is displayed. We're now using tabs to show the subscription details, invoices, and transactions. This also includes information about whether the customer has a payment method on file when viewing invoices.
- Updated the way a failed payment notification is displayed on the invoice payment page. It no longer shows in the upper right, which could hide the payment button.
- Updated the invoice detail page to improve how the invoice and invoice transactions are displayed. If the customer does not have a payment method then that is displayed, and a link to record a payment is shown.
Bug fix
- Fixed the issue where the form error wasn't automatically hidden after leaving the form and navigating to another page.
February 4, 2026
We have released several updates to the user management functionality in Aptuitiv. Some of the highlights include:
- You can access the new user management from three spots.
- From your dashboard, click the website you want to manage users for.
- If you're logged into a website, click the "Users" navigation item at the top, then select "Admin Users."
- If you're logged into a website, you can also click the User icon in the top-right and then select "Manage website users".
- You can view users and domains in each account.
- You can remove users from an account or domain.
- There is a new "Website Admin" user type that has full access to the domains it's assigned to and can manage users for that domain.
- You can now set the user type when inviting a user.
- User types permissions are enforced. The Website Editor user type can only view information.
January 20, 2026
Invite users in the new administration
We've been working on our new administration for a while, and some clients are using it. We've focused on the content editing functionality first, which meant user management was left out. Websites on the old admin still have user management features, but websites on the new administration don't.
They do now.
Because the new administration enables a user to be part of multiple domains and accounts, the user management functionality is quite different.
Instead of just adding a user and setting their full details, you now invite a user by entering their email address. If they are a brand-new user in the entire Aptuitiv system, you can optionally enter their first and last name. The user will then get an email inviting them to join your website. If they are a new user they will need to enter their name and password when accepting the invitation. If they already have an Aptuitiv account, then they can just accept the invitation, and then they will have access to the website.
Here is how you do it.
- On the dashboard, click on the website that you want to invite a user to.
- Click on the "Invite User" button in the upper right.
- Fill out the form and submit it to invite the user.
If you don't see the "Invite User" button, then you might not have the right user permissions. Contact the administrator of your account or contact our support team for assistance.
This is just the initial release of user management. We're working on different user roles within an account, inviting users to an account instead of individual domains, user permissions, and more user-editing capabilities.
December 18, 2025
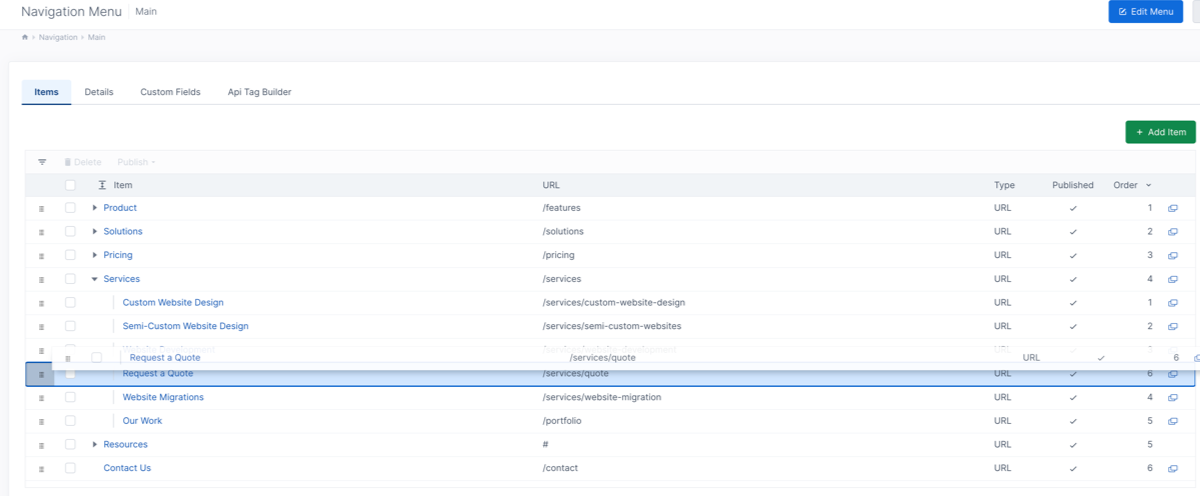
Added support for dragging and dropping table rows to reorder or reorganize table items.
The old admin support drag-and-drop reordering works for some items, but not for nested rows.
The new functionality supports dragging table rows up and down to reorder. You can click and hold on the "drag" icon on the left of the row, or click and hold anywhere on the row.
If the table supports nested rows, you can:
- Drag items up and down within the parent row.
- Drag items to the left or right to change the parent item.
- Drag a row and hover over another row to expand it and move the dragged row as a child to the other row.
- Drag an item out of its parent row to another row level.
This will be used to reorder and reorganize app items via drag-and-drop.
We initially set this up for navigation menu items and will add it to more tables soon. For navigation items, you can drag and drop to reorder items or to change the parent of an item.
November 20, 2025
Improved the preview feature of the Embed and YouTube components. Previously, previewing would show an error.
We also fixed an issue that prevented new public users from registering a new account.